26 KiB
My Turnkey-5 Implementation
Several people have asked me how I managed to get a mainframe running on my laptop. This post explains how I did that. Enjoy!
Setting Up The Host Machine
You can run the entire setup from your native workstation, if you want. But that's not what I did. for the sake of portability, compatibility, and stability, I constructed a virtualbox using Debian 12, on which to host the Turnkey package:
- ISO: Debian 12 (64bit)
- CPU(s): 2 (explained in a moment)
- Acceleration: Paging, VT-x/AMD-V, PAE/NX, KVM
- RAM: 1024MB
- Display: Default
- Storage: VDI 60GB
- Network: Bridged
The reason for 2 CPUs is because when we set up the TK5 system, it will include two of its own mainframe cpus, and we want to be able to take advantage of that on the host.
The reason for the BRIDGED adapter, is because we want to make the mainframe accessible from other devices on the local subnet. If everything you do is local to the host machine, then a normal NAT connection will also work.
Go through the normal debian installation process. Don't include a desktop environment, because it won't be needed. Make sure to include the ssh server as part of the installation, and make sure you're able to ssh into the the VM from your host:
gmgauthier@boethius $ ssh sysa
Linux tk5-sysa 6.1.0-23-amd64 #1 SMP PREEMPT_DYNAMIC Debian 6.1.99-1 (2024-07-15) x86_64

The programs included with the Debian GNU/Linux system are free software;
the exact distribution terms for each program are described in the
individual files in /usr/share/doc/*/copyright.

Debian GNU/Linux comes with ABSOLUTELY NO WARRANTY, to the extent
permitted by applicable law.
Last login: Tue Jan 14 21:45:05 2025 from 192.168.68.103
Installing Turnkey
Next, you'll want to install the base turnkey package to the root account. You'll be working entirely from root now. Use wget to download the zip file from Eric Prince's Turnkey Page, to the root account. Once there, unzip it in place. your director should now have an mvs-tk5.zip file, and an mvs-tk5 directory:
gmgauthier@tk5-sysa:~$ su root
Password:
root@tk5-sysa:/# cd /root
root@tk5-sysa:~# ls -l
total 432068
-rw-r--r--  1 root root        34 Aug  3 16:35 blkid.txt
drwxr-xr-x  3 root root      4096 Aug  3 17:05 go
drwxr-xr-x 20 root root      4096 Aug  4 03:19 mvs-tk5
-rw-r--r--  1 root root 442420923 Jul 29 22:25 mvs-tk5.zip
drwxr-xr-x 10 root root      4096 Aug  3 17:05 virtual1403
root@tk5-sysa:~#
cd into the mvs-tk5 directory. This is roughly what you should see:
root@tk5-sysa:~/mvs-tk5# ls -l
total 100
drwxr-xr-x  2 root       root       4096 Aug  4 13:00 archive
drwxr-xr-x  3 root       root       4096 Oct 25 17:04 conf
drwxr-xr-x 11 root       root       4096 Jul 29 22:25 ctca_demo
drwxr-xr-x  2 root       root       4096 Aug  4 21:12 dasd
drwxr-xr-x  2 root       root       4096 Jul 29 22:25 doc
-rw-r--r--  1 root       root       1104 Aug  1 22:27 herclogo.txt
drwxr-xr-x  7 root       root       4096 Aug  1 22:22 hercules
drwxr-xr-x  2 root       root       4096 Aug  4 09:05 jcl
drwxr-xr-x  2 root       root       4096 Jul 29 22:25 local_conf
drwxr-xr-x  2 root       root       4096 Aug  4 01:46 local_scripts
drwxr-xr-x  2 root       root       4096 Jul 29 22:25 log
-rwxr-xr-x  1 root       root       1221 May 30  2023 mvs
-rwxr-xr-x  1 root       root       1776 May 30  2023 mvs.bat
-rwxr-xr-x  1 root       root       2196 May 30  2023 mvs_ipl
-rwxr-xr-x  1 root       root       1489 May 30  2023 mvs_osx
drwxr-xr-x 16 root       root       4096 Jul 29 22:25 Packages
drwxr-xr-x  2 root       root       4096 Jul 29 22:25 pch
drwxr-xr-x  2 gmgauthier gmgauthier 4096 Aug  3 17:45 printouts
drwxr-xr-x  2 root       root       4096 Jul 29 22:25 prt
drwxr-xr-x  2 root       root       4096 May 24  2013 rdr
drwxr-xr-x  3 root       root       4096 Aug  4 13:56 scripts
-rw-r--r--  1 root       root       1968 Aug  6  2023 start_herc
-rw-r--r--  1 root       root       1331 Aug  6  2023 start_herc.bat
drwxr-xr-x  2 root       root       4096 Jul 31 21:19 tape
drwxr-xr-x  2 root       root       4096 Jul 29 22:25 unattended
Configuring Turnkey
We'll now need to make a few minor configuration changes to be able to run our system locally. cd into the "conf" directory:
root@tk5-sysa:~/mvs-tk5# cd conf
root@tk5-sysa:~/mvs-tk5/conf# ls -l
total 132
-rw-r--r-- 1 root root   131 Mar 29  2023 cbt_dasd.cnf
-rw-r--r-- 1 root root   212 May 30  2023 extcons.cnf
-rw-r--r-- 1 root root    89 Nov 15  2013 intcons.cnf
-rw-r--r-- 1 root root   894 May 15  2020 local.cnf
-rw-r--r-- 1 root root   160 Mar 29  2023 source_dasd.cnf
-rw-r--r-- 1 root root  2542 Aug  4 11:49 tk5.cnf
-rw-r--r-- 1 root root  3550 May 30  2023 tk5_default.cnf
-rw-r--r-- 1 root root  1125 May 30  2023 tk5_specific02.cnf
drwxr-xr-x 2 root root  4096 Jul 29 22:25 tk5_updates
-rw-r--r-- 1 root root   928 May 30  2023 tk5_updates.cnf
-rwxrwxrwx 1 root root 29360 Dec  7  1998 ZZSACARD.BIN
-rw-r--r-- 1 root root  1026 Aug  4 09:53 zzsa.cnf
-rwxrwxrwx 1 root root 26400 Dec  7  1998 ZZSADIMG.BIN
-rwxrwxrwx 1 root root 26400 Dec  7  1998 ZZSATIMG.BIN
Now, edit the tk5.cnf file, which is the default configuration (despite the fact that there's already a file by that name). You should see this as the first few lines before the device configs:
#**********************************************************************
#***                                                                ***
#*** File:    tk5.cnf                                               ***
#***                                                                ***
#*** Purpose: Hercules configuration file for MVS 3.8j TK5          ***
#***                                                                ***
#*** Updated: 2023/05/30                                            ***
#***                                                                ***
#**********************************************************************
MSGLEVEL -EMSGLOC
${EXPLICIT_LOG:=#}
CPUSERIAL 000611
CPUMODEL 3083
MAINSIZE ${MAINSIZE:=16}
XPNDSIZE 0
CNSLPORT ${CNSLPORT:=3270}
HTTP PORT ${HTTPPORT:=8038}
HTTP ROOT hercules/httproot
HTTP START
NUMCPU ${NUMCPU:=2}
MAXCPU ${MAXCPU:=2}
TZOFFSET +0000
ARCHMODE S/370
OSTAILOR QUIET
DIAG8CMD ENABLE ECHO
Set CPUMODEL to 3083. Then, set NUMCPU and MAXCPU to 2. Finally, set TZOFFSET to either + or - the value in hours, relative to GMT. I personally just leave it as-is, because I don't care about the precise time. Once that's all done, the system will be set up to take advantage of both cpus on the virtual host.
Below the basic configuration values, you'll find the "DASD" virtual volume configuration. "DASD" is the IBM acronym for "Direct Access Storage Device", which basically just means magnetic disk. Or, in our case, virtual files that emulate IBM magnetic disk devices.
#
# TK5 DASD
#
0390 3390 dasd/tk5res.390
0391 3390 dasd/tk5cat.391
0392 3390 dasd/tk5dlb.392
0380 3380 dasd/int001.380
0190 3390 dasd/tso001.190
0191 3390 dasd/tso002.191
0192 3390 dasd/tso003.192
0248 3350 dasd/page00.248
0249 3350 dasd/spool0.249
0290 3390 dasd/work01.290
0291 3390 dasd/work02.291
0292 3390 dasd/work03.292
0293 3390 dasd/work04.293
0298 3390 dasd/tk5001.298
0299 3390 dasd/tk5002.299
ALL of these volumes are absolutely necessary for a full system. But the most important volumes are the ones suffixed RES, CAT, and the PAGE and SPOOL volumes.
The RES Volume stands for "System Resident", and just means all the datasets that need to be loaded directly into memory for system execution. This of this as the conceptual equivalent of a bootstrap directory of a PC.
The CAT Volume stands for "System Catalog", and contains an indexed list of all the datasets available on your MVS system. Without this, you would have no way to access data on the system. Think of it as the conceptual equivalent of a VTOC on a PC disk drive.
The PAGE volumes are conceptually similar to Swap partitions on a linux machine, and the SPOOL volume is actually kind of unique to MVS. It's a place where all program output is queued for distribution to an output device like a printer.
The remaining disk volumes are data disk volumes for storing source code, binary executables, and other forms of data necessary for application programs.
The next batch of lines in the configuration file, are for peripheral devices attached to the mainframe:
# unit record devices
#
0002 3211 prt/prt002.txt ${TK5CRLF}
#000E 1403 prt/prt00e.txt ${TK5CRLF}
000E 1403 localhost:1403 sockdev
000C 3505 ${RDRPORT:=3505} sockdev ascii trunc eof
000D 3525 pch/pch00d.txt ascii
0480 3420 *
010C 3505 jcl/dummy eof ascii trunc
010D 3525 pch/pch10d.txt ascii
#000F 1403 prt/prt00f.txt ${TK5CRLF}
000F 1403 localhost:1404 sockdev
030E 1403 log/hardcopy.log ${TK5CRLF}
The first column sets a device id the system will use to identify the peripheral. The second column is the model of the device, which effectively identifies the kind of device. A 1403 is a printer. A 3505 is a card reader. A 3525 is a card punch. Device 0480 is a 3420 tape drive. This will be important to know, when we attempt to apply the supplement tape update to this instance.
By default, all output devices are defined to dump to text files on the host system path for that device ("prt/", "pch/", "log/"). But you will notice that a few have been defined with TCPIP ports instead. The reader device on 000C, for example, is set to port 3505. This will come into play in a further post, on how to submit remote JCL cards to your mainframe, which will make it easy to write and submit JCL from someplace like VSCode!
Note also, tha there are two 1403 Printers defined to localhost:1403 and localhost:1404. These printers will send all of their plain-text output to those ports. A separate post here will explain how to set up linux printer daemons that will produce greenbar PDF files from that output, and ship it to an output directory on your local machine.
Lastly the configuration file sets up our 3270 devices and terminals. These are the way we will "log in" to the system as a human user, and interact with it; writing programs, running programs, looking at output, and other things.
#
# local 3270 devices (VTAM)
#
00C0 3270
00C1 3270
00C2 3270
00C3 3270
00C4 3270
00C5 3270
00C6 3270
00C7 3287
#
# local 3270 terminals (TCAM)
#
03C0 3270 TCAM
03C1 3270 TCAM
03C2 3270 TCAM
03C3 3270 TCAM
03C4 3270 TCAM
03C5 3270 TCAM
03C6 3270 TCAM
03C7 3270 TCAM
For now, that's all we really need to cover in the configuration file. So, let's close out of the file, and cd back into the base directory
root@tk5-sysa:~/mvs-tk5/conf# nano tk5.cnf
root@tk5-sysa:~/mvs-tk5/conf# cd ..
root@tk5-sysa:~/mvs-tk5#
Running The Turnkey MVS Instance
At this point, there is technically only one other thing that is necessary to get the system going. You will want to do this so that you can interact with the machine directly from the console. cd into the "unattended" directory:
root@tk5-sysa:~/mvs-tk5# cd unattended
root@tk5-sysa:~/mvs-tk5/unattended# ls -l
total 20
-rw-r--r-- 1 root root   8 Dec  2 09:52 mode
-rwxr-xr-x 1 root root 788 Jul 23  2023 set_console_mode
-rwxr-xr-x 1 root root 830 Nov 28  2013 set_console_mode.bat
-rwxr-xr-x 1 root root 792 May 30  2023 set_daemon_mode
-rwxr-xr-x 1 root root 828 May 30  2023 set_daemon_mode.bat
Run the set_console_mode script:
root@tk5-sysa:~/mvs-tk5/unattended# ./set_console_mode
Hercules console mode activated for unattended operations mvs
Press any key to continue...
Once that's done, return to the base directory. From there, we can launch the system with the mvs command, which will load the master console directly:
root@tk5-sysa:~/mvs-tk5/unattended# cd ..
root@tk5-sysa:~/mvs-tk5# ./mvs
HHC01536W HDL: WARNING: '/usr/local/lib/hercules' is not a valid directory
HHC00007I Previous message from function 'hdl_checkpath' at hdl.c(769)
HHC01413I Hercules version 4.7.0.0-SDL
HHC01414I (C) Copyright 1999-2024 by Roger Bowler, Jan Jaeger, and others
HHC01417I ** The SDL 4.x Hyperion version of Hercules **
HHC01415I Build date: Mar 11 2024 at 19:11:26
HHC01417I Built with: GCC 11.4.0
HHC01417I Build type: GNU/Linux x86_64 host architecture build
HHC01417I Modes: S/370 ESA/390 z/Arch
HHC01417I Max CPU Engines: 128
[ truncated ]
. . .
Congratulations. You are now at the Master Console of an IBM S/370 running MVS 3.8j. A system that, back in 1980, would have cost you approximately $4.7m ($17.9m in current day).
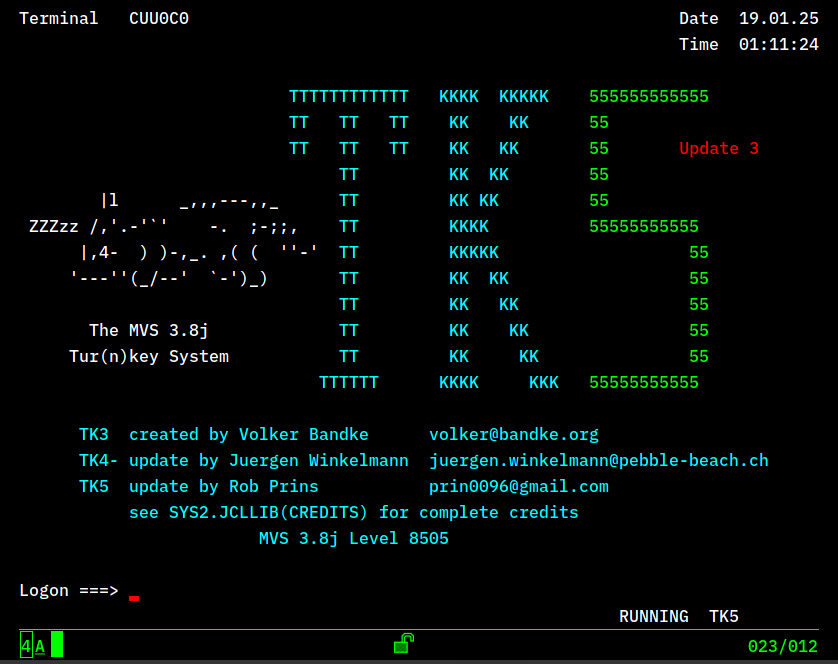
Mastering The Master Console
HHC01603I *                           TT   TT   TT    KK    KK       55                  +
HHC01603I *                           TT   TT   TT    KK   KK        55      Update 3
HHC01603I *                                TT         KK  KK         55
HHC01603I *        4l      _,,,---,,_      TT         KK KK          55
HHC01603I * ZZZzz /,'.-'`'    -.  ;-;;,    TT         KKKK           55555555555
HHC01603I *      4,4-  ) )-,_. ,( (  ''-'  TT         KKKKK                    55
HHC01603I *     '---''(_/--'  `-')_)       TT         KK  KK                   55
HHC01603I *                                TT         KK   KK                  55
HHC01603I *       The MVS 3.8j             TT         KK    KK                 55
HHC01603I *     Tur(n)key System           TT         KK     KK                55
HHC01603I *                              TTTTTT      KKKK     KKK    55555555555
HHC01603I *
HHC01603I *     TK3 created by Volker Bandke       volker@bandke.org
HHC01603I *     TK4- update by Juergen Winkelmann  juergen.winkelmann@pebble-beach.ch
HHC01603I *     TK5  update by Rob Prins           prin0096@gmail.com
HHC01603I *          see SYS2.JCLLIB(CREDITS) for complete credits
HHC01603I *
HHC02264I Script 4: file scripts/tk5.rc processing ended
HHC00013I '/' input entered for console 0:0009: "d r,l"
d r,l
/23.13.27           IEE111I NO OUTSTANDING REQUESTS
herc =====>
At this point, most of you will be wondering: "Okay. What now?". Well, now you operate your system. That's what. There is a distinction that needs to be made here. It's not like how we "use" microcomputers today. Back in the day, there was an "operator", and there was a "user". The user was the administrator, the programmer, or the accountant, who just used various programs available to him on his terminal device.
The Operator, however, sat all day long at this console, monitoring system resources, responding to system prompts, mounting tapes, running utility jobs, printing output, and occasionally "IPLing" the system (what we now call 'rebooting'). The following will provide a few simple examples of how you can use the master console to manage your system. For more in-depth details, I will provide links at the bottom to ACTUAL IBM Documentation, that is very similar to what I used when I was being tutored on-the-job, back in 1988.
What's Running?
To know how to operate the system, you need to know a little something about the system. For starters, how do you enter commands, and what are they showing you? For example, how can you see all the things running on the system? For linux users, there's the ps command, or htop if you prefer something a little more aesthetically pleasing. It's kind of not like that on MVS.
First, you're technically not at the master console. You're at the HERCULES prompt which is laying on top of the master console. What is Hercules? Hercules Hyperion is the hardware emulator. It's the software stack that makes MVS think it's on an actual S/370. So, to send commands to MVS, you have to prefix your console interactions with a /. The forward-slash tells Hercules "this is destined for MVS".
Second, you need to understand that there are different layers of interaction with MVS. Unprefixed commands (not counting the forward-slash), will get picked up and processed by the MVS kernel itself. Commands that are prefixed with $ will get intercepted by the Job Entry System, which handles all the work of executing "metered" code on the mainframe. There are other prefixes. But these two are the most important (none, and $).
MVS Tasks
So, to see everything that Linux users might call "daemons" running on the system, you use the MVS DISPLAY command. It has the abbreviation D. It looks like this:
HHC00013I '/' input entered for console 0:0009: "d a,l"
d a,l
/ 0.01.24           IEE102I 00.01.24 25.019 ACTIVITY 455
/    00009 JOBS    00006 INITIATORS
/   CMD1     CMD1     CMD1      V=V
/   BSPPILOT BSPPILOT C3PO      V=V  S
/   JES2     JES2     IEFPROC   V=V
/   NET      NET      IEFPROC   V=V
/   TP       TP       TCAM      V=V
/   MF1      MF1      IEFPROC   V=V  S
/   TSO      TSO      STEP1     V=V  S
/   SNASOL   SNASOL   SOLICIT   V=V
/   JRP      JRP      JRP       V=V  S
/    00000 TIME SHARING USERS
/    00000 ACTIVE  00040 MAX VTAM TSO USERS
Note, I endered: D A,L. This means "Display All, in List Form". It's like ps -ef, but for MVS tasks.
Notice also, the very first line of the output. This is Hercules telling you that it notice you entered a command, and is acknowledging that the command is destined for the MVS system it is hosting. Then mvs shows you the actual mvs command I entered, followed by the output.
I'm not going to go over the entire output. For that, you'll have to refer to the IBM documentation. Suffice for this document, to point out just a few important notes:
- The first row shows you how many "tasks" are running, and how many "batch" job "initiators" you have available for processing "metered" jobs.
- The first column of the table is the name of each "task" running.
CMD1andBSPPILOTare like "TSR" programs. They're long-running scripts that bootstrap the system, and listen for shutdown commands. On a NORMAL MVS system, these will NOT be present. They appear on our Turnkey, because all the manual work of bootstrapping, and shutting down, has been cooked up for us, so we don't have to do it OLD-SKOOL like a real console operator would have to back in the day.- The first 'system' entry is called
JES2. That is your Job Entry System. It will ALWAYS be the very first task on a normal MVS system, because it controls the submission of ALL other work on the system. NETis the task that provides MVS networking capabilities. This includes both SNA and TCPIP architectures.- I've forgotten what
TPis, butMF1is the "Monitoring Facility". This task keeps track of all the the run statistics of both your base system, and of your "metered" jobs. Technically, you don't need to run this on the Turnkey system, since there's no real need to monitor run statistics, which would normally have been parsed up and sent in batches to IBM, and your accounting department. IBM would get the base statistics for the system. Your accounting department would figure up a cost for each department that matched it's usage of the system, and that cost would be billed to clients. SNASOLis shorthand for "System Network Architecture Solicitor". In short, it is a task that does nothing more than listen for terminals trying to connect to the system throughtNET, intercept those connections, and present the terminal display with a logon splash screen, and user entry fields.- I can't remember what
JRPis.
JES2 Jobs
Metered work, such as when a programmer wants to submit a piece of source code to be compiled, or when an accountant wants to submit a program to process a collection of of purchase records, would be done by sending JCL job cards to the card reader we talked about above in the configuration section. In practical terms, those cards would look something like this:
 000001 //@050541  JOB (JCL),'JCL HELLO EXAMPLE',NOTIFY=&SYSUID,
 000002 //             CLASS=A,MSGCLASS=H,
 000003 //             MSGLEVEL=(1,1),
 000004 //             REGION=4M,TIME=1440
 000005 //HELLO EXEC PGM=IEBGENER
 000006 //SYSPRINT DD SYSOUT=*
 000007 //SYSIN DD DUMMY
 000008 //SYSUT1 DD *
 000009  HELLO, WORLD!
 000010 //*
 000011 //SYSUT2 DD SYSOUT=*
 000012 //
To see all of this work, normally, you'd enter this command: $da, with parameters defining filtering and sorting as needed. However, on the Turnkey system, jobs run so quickly (most finish in less than 2 or 3 seconds), that it's just not possible to generate enough workload to demonstrate the command. In any case, here's what it looks like when no jobs are running:
HHC00013I '/' input entered for console 0:0009: "$da"
$da
/ 0.40.52           $HASP000 NO ACTIVE JOBS
And here is what it looks like on the master console, when I submit the job above. I will do another post explaining how to create jcl, write code, and submit jobs of your own, at another time. Suffice it for this document, to show how to read the master console.
/ 0.45.29 JOB  150  $HASP100 @050541  ON INTRDR      JCL HELLO EXAMPLE
/ 0.45.29 JOB  150  $HASP373 @050541  STARTED - INIT  1 - CLASS A - SYS SYSA
/ 0.45.29 JOB  150  IEF403I @050541 - STARTED - TIME=00.45.29
/ 0.45.29 JOB  150  IEF404I @050541 - ENDED - TIME=00.45.29
/ 0.45.29 JOB  150  $HASP395 @050541  ENDED
/ 0.45.29           $HASP309    INIT  1 INACTIVE ******** C=A
/ 0.45.29 JOB  150  $HASP150 @050541  ON PRINTER1        49 LINES
/ 0.45.29           $HASP160 PRINTER1 INACTIVE - CLASS=A
/ 0.45.29 JOB  150  $HASP250 @050541  IS PURGED
Reading Console Messages
The messages above might seem a bit confusing at first. Let's take a simpler example. Here's an example of console messages generated by the Monitoring Facility, which was running a batch job for the first hour of my instance:
/ 0.12.27 STC  446  $HASP150 MF1      ON PRINTER1       209 LINES
/ 0.12.27 STC  446  IRB101I MF/1 REPORT AVAILABLE FOR PRINTING
/ 0.12.27           $HASP160 PRINTER1 INACTIVE - CLASS=A
/ 0.12.30           $HASP000 OK
Reading these lines from left to right: timestamp, STC ("system task"), task number, IBM messageid, "english language message"
Note that ALL of the IBM message ids you see in these output messages are searchable on Google. EG:
IBM HASP Message
The message $HASP150 is related to job processing in IBM’s JES2 (Job Entry Subsystem 2) environment. Here is a summary of the message and its context:

$HASP150 JOB jij jobname OUTGRP = STC TSU ON devname nnnn (mmmm) LINES nnnn (mmmm) CARDS nnnn (mmmm) PAGES: This message indicates that device devname is beginning to process the output identified in the grpid.joeidl.joeid2 fields for the indicated job. The message includes details such as the number of lines, cards, and pages being processed.
This message is informational and does not require any specific action from the operator or programmer. It is part of the system’s logging mechanism to inform about the processing status of jobs in the JES2 environment.
Logging On To System
Moving on from Console Operator to System User (such as a programmer might be), how would one access the system? This is done through a 3270 terminal attached to an SNA endpoint. In the old days, this was a physical CRT, keyboard, and minimal set of microprocessing hardware needed to communicate on the SNA network.
TODAY, however, we emulate 3270 in terminal emulation programs, just as we emulate VT100, VT220, and VT232. There are a WHOLE BUNCH of decent 3270 emulation programs out there, but my favortes are c3270 on Linux terminal for a minimalist approach, and pw3270 which has a GTK GUI for a more soup-to-nuts terminal console. Either one is fine, or whatever you prefer. I'll leave it to you, to read the documentation for whatever terminal emulator you choose.
If you'll recall back at the beginning of the configuration section, there was one entry that was important to this section:
CNSLPORT ${CNSLPORT:=3270}
This sets the IP PORT for terminal logins to 3270 (matching the model number, of course). So, if you want to connect with a 3270 emulator to your instance, you'd use the following IP address in your connection settings: {your.ip.add.ress}:3270.
Once connected, you should see something like this:
More to come...